Showing posts with label handmade. Show all posts

Wednesday, February 1, 2012

*hanky holders*

Hi all! Just wanted to share with you a little project we've been working on in the classroom. I got the idea from a fellow Montessori teacher at my school and thought it was a great project for cold and flu season! Sewing "hanky holders" - a cute way of saying tissue holders!

All you need is felt, craft thread, scissors, a needle, and tissues!


Pictured above is how I presented this work on the shelf (there is 1 for each child in the class). It was a lot of prep work- but the outcome was so cute and the children really loved it- which makes it all worth it! (they carry them around in their pockets- always prepared for a runny nose)

I cut rectangles of felt out with pinking shears and then a small heart (for their initials)...


Folded and ironed the ends to meet in the middle...


Embroidered their initials on the small hearts and glued them on to each felt rectangle...


Then to make it a more independent work, I dotted along the edges to show where the stitches needed to be.


And the final look- complete with tissues and all!


It's amazing how well the children can sew! Some of the little ones surprised me- able to thread their own needle! I also took this opportunity to teach the Kindergartners how to tie a knot in the end of their thread- they were so proud when they finally did it :-) 

Since this sewing project was such a success- stand by for our Valentines Day project...

<3 have a great week! 


Sunday, December 25, 2011

On the first day of Christmas...

Merry Christmas! Steve and I are down in VA visiting his dad and mom. We are enjoying the sunshine and mild temperatures and of course the delicious food! MmmMmm

I wanted to save this post for Christmas day as it is a "Partridge in a Pear Tree"!


I got a bird pattern from Spool (same place I got my sewing machine snuggy pattern) and decided to use some of my left over pear fabric (from one of my many aprons!) to make a fun ornament for the tree- the tree we don't have up this year :-(


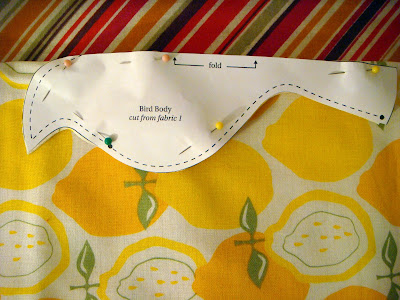
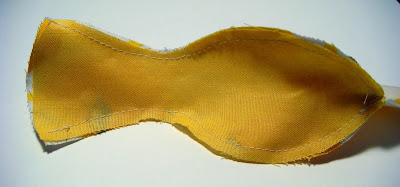
The pattern was pretty simple- although I did get stuck on step 2 when it asked me to sew the 1 side of the belly to the outside fabric but starting at the tail- lining it up was not working out!! But with a little trial and error I got it (this could have just been from my sewing inexperience- you might be just fine!).


But just in case...I took some pictures along the way so you have a visual!


I braided some craft floss together and made a loop at the top of the bird to hang it. I also had the hubs search out back for the perfect twig for my little birdie to sit on. I hot glued it and hand sewed it on.


It turned out adorable....even Lincoln loved it!!

The whole thing took about an hour (from start to finish)...not bad for a quick little project!

enjoy your xmas day <3

Tuesday, December 13, 2011

sewing machine snuggy


The temperatures are definitely beginning to drop and winter is right around the corner. I've broken out my winter coat and all that goes with it...hat, gloves, scarf. It only seemed fitting to make my sewing machine a little something to keep it warm...

a sewing machine snuggy.

I first spotted this idea at a new adorable craft shop called Home Made. It's located off of Route 9 down the shore (meaning the Jersey Shore) and it's where my Mom goes for all of her crafting needs. While I was visiting the fam for Thanksgiving we went to visit and I fell in LOVE with everything!! This shop was every craft lovers dream! Of course I had to buy some fabrics because they were all so beautiful- but the only way I could justify it to myself was if I had a project in mind to use them for. As I walked around the shop- eyeing up everything... I spotted these sewing machine covers in the back "studio" (where Julie offers/holds a variety of classes) and asked how she made them. Julie directed me to a friends website called Spool where I could download the free pattern! Check it out! Well, there you go... so I bought a few fabrics, came home, and went to work.


The pattern was super easy to follow and the whole project only took me a little over an hour (I would categorize myself as a slow sewer). I got to use my rotary cutter and mat again- which is always fun! I also did not make my own pattern out of paper (as the directions suggested)- I just drew it on my fabric using white fabric chalk.


At first, the snuggy seemed a little 'too snug', but with time the fabric has stretched a bit and it fits much better now.


This is definitely an improvement from the thin, ripped vinyl cover that originally came with my machine :-)

Thursday, December 8, 2011

snowflake ornament: a gift


Hi! I wanted to stop in real quick to share what I've been up to... I have a few projects on my plate right now- but with the Holidays quickly approaching I wouldn't expect anything different.

The big project right now is making my kids (and by 'my kids' I mean my students) their Christmas (Oops I mean Holiday) presents. As with my Halloween Costume- I'm on a 3 year rotation (just like the Montessori way) with my presents to the children. I always want it to be something that I make- but something that will be both, cost and time effective. Last year I crocheted little stocking ornaments...


This year I decided to crochet snowflake ornaments! I found the pattern on Aesthetic Nest and thought they were so adorable. She uses them as gift toppers- but I thought they would work out just fine as ornaments. They take about 30 minutes each, and I don't consider myself a fast crochet-er, especially when I have this little one constantly stealing my yarn...


But they are turning out so adorable!! I can't wait to give them out to my little ones :-)


I think I may soak them in a glue/water solution with glitter to make them stiff and add a lil sparkle! I'll let you know how that all works out.


12 down, 8 more to go...


Friday, November 25, 2011

secret santa

Happy Thanksgiving!! 

I wanted to stop in real quick and share with you a little something I made for my secret santa.

In my family we do 2 secret santas...one where we make a present and one where we buy a present.

I picked my sister to make for... how fun!! I knew right away what I wanted to make.... the ruffle tote from V and Co. I saw this tutorial and thought it was so cute!! I ordered the ruffle fabric (in 2 colors!! steel orchid and charcoal cascading ruffle...I plan on making myself a tote and a skirt) and went to the store to get the rest of my 'ingrediants'...I even splurged and FINALLY bought a rotary cutter and a cutting mat! (If you do not have these tools- GO GET THEM... it made cutting so much easier and 10x's faster)


This tutorial was very easy to follow and my tote came out great!! The ruffle fabric was a little tricky- but definitely manageable...hey... if I can do it- you can do it.


I also made the flower by following Vanessa's flower corsage tutorial. While making the flower I remembered how much I disliked the glue gun- the never ending webs of glue and stick to everything..ugh! But... the end result was worth it!

Wednesday, September 21, 2011

I spy...


Remember how I told you I had a fun to-do for you all! Well it's finally here...

My version of the 'I spy' bottles.
I bought 4 lock lid Tupperware from JoAnn's (on sale!) and I knew as soon as I saw them that they were perfect for 'I spy' bottles. I've seen several versions of them floating around the blog world and on pinterest and wanted to make my own...I even saw them for sale at Becker for $20!!! Yikes!


So here's what to do...


Color some rice (click HERE for a great tutorial), fill the Tupperware with rice (almost full-leave enough room for the child to be able to shake the rice around) and find small enough objects to hide in the rice. I have only made 2 so far...


One with red rice and small alphabet beads (there's also 1 hiding in there with a heart on it and the kids love it when they find it!)


One made with orange rice and 8 small 3 letter word objects. In it I've hidden a pig, cow, key, pot, hat, nut, dog, and ant.


To make a paper trail, I made 2 sheets for the alphabet bottle- 1 with 26 blanks for the child to write in each letter they find and then another sheet with the letter and a blank next to it so the younger children can check off each letter as they find it. For the 3 letter word bottle I have 8 blanks for them to write in each word as they find the object. (this one is for children who are writing and spelling 3 letter words)


These have been a big hit in the classroom!! I plan on making 2 more bottles; one with 4 letter word objects and one with numeral beads (1-20).